Highlighting & Contouring Tutorial for a Perfectly Sculpted Face
Posted by TEAM BARVA

When it comes to makeup, highlighting and contouring, or color contouring is the art of sculpting certain key features of your face, such as your nose, chin, jawline, and cheeks, to appear perfect. In simple terms, highlight means to bring forward, and contour means to push back.
Earlier, highlighting and contouring was a skill that was possessed only by highly professional makeup artists. However, today, there are countless tutorials breaking down the same on social media platforms such as YouTube, IGTV, Instagram, etc. In this article, we will share with you some quick and easy tips for highlighting and contouring, with which you can achieve professional-style makeup on your own in the comfort of your home, without having to spend tons of money on a professional.
What you need:
1) Foaming facewash (to cleanse your face and neck area)
2) Primer (optional)
3) Foundation in the shade of your skin tone
4) Foundation or concealer that is a shade or two darker than your skin tone
3) Loose powder
4) Luminizer/Highlighter powder
Here are the steps you need to follow to add a professional touch to your makeup. Do them in this order:
1) Prep & Prime your Face:
To begin with, start with an appropriately cleansed face. Use a foaming facewash suited to you skin type. Follow it up with a gentle and light moisturizer. After that, apply a primer (optional), followed by a foundation that matches the shade of your skin tone (very important).
A creamy SPF Foundation works best for a party look or for longer wear, especially if your skin is dry. It is easy to blend, offers full coverage, and forms a protective barrier on your skin against the sun as well as damage from environmental factors. A darker shade of this foundation can be used as a contouring product.
2) Contouring
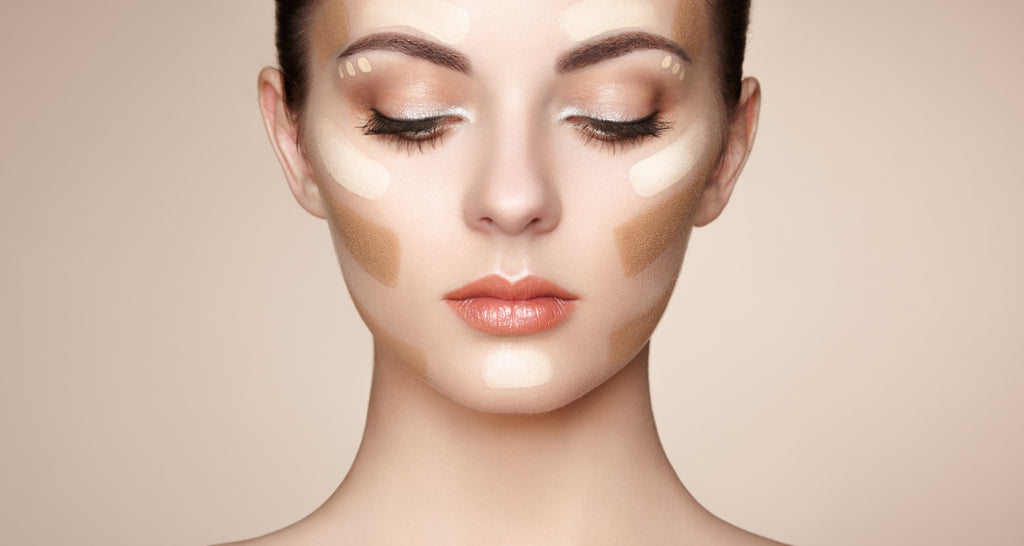
For contouring, apply the foundation or concealer in a darker shade as follows:
Make a thin line that covers your jawline in a manner in which it will conceal your double chin, if any, or to give your jaw a sculpted or chiseled look.
- Make thin lines in the hollows of both the cheeks. To find the hollow in your cheeks, suck both your cheeks in. The hollow that is created as a result of that is the right place to place your contour. Make a thin line at the centre of this hollow with your darker foundation or concealer.
- If you have a round or squarish face, make a half-inch line close to the hairline on the sides of your forehead, just above the temple region.
- The next step is to blend these lines. If you are using a liquid foundation/concealer, dab it gently with a sponge and get rid of the harsh lines. If you have used a cream foundation, such as the Barva Skin Therapie SPF Foundation, you can use your fingers.
- Once you have blended your contour lines, dab some loose powder foundation with a brush, not a sponge/puff, all over your face and neck to set the contour as well as your base foundation.
2) Highlighting
I must add here, that whatever other makeup you wish to apply, i.e., blush, eyeshadow, eyeliner, lipstick, etc., should be applied at this stage, as highlighting should ideally be the last step of your makeup routine.
With contouring, you have pushed back the features that you want to conceal. Now, it is time to bring forward or highlight your best features, i.e., the best parts of your face. Using a powder highlighter/luminizer is highly recommended because it is easier to use/control as opposed to a cream highlighter or strobing liquid. Take some highlighter powder on a broad makeup brush, and apply as follows:
- On your T zone - start from the forehead (leave the temples), go between your eyebrows and the bridge of your nose.
- Reload some product on your makeup brush and brush on some highlighter on your chin.
- Next, brush some highlighter on your cheekbones, just above the hollow that you have created with your contouring. Brush it from the centre of your cheekbone in a crescent shape towards the temples.
- With a tiny brush, apply some highlighter just under your eyebrows and in the inner corners of your eyes. It will add a professional look to your eye makeup.
- Lastly, brush some highlighter on the cupid's bow portion, which is on the top edge of your upper lip, to highlight your lips.

